on

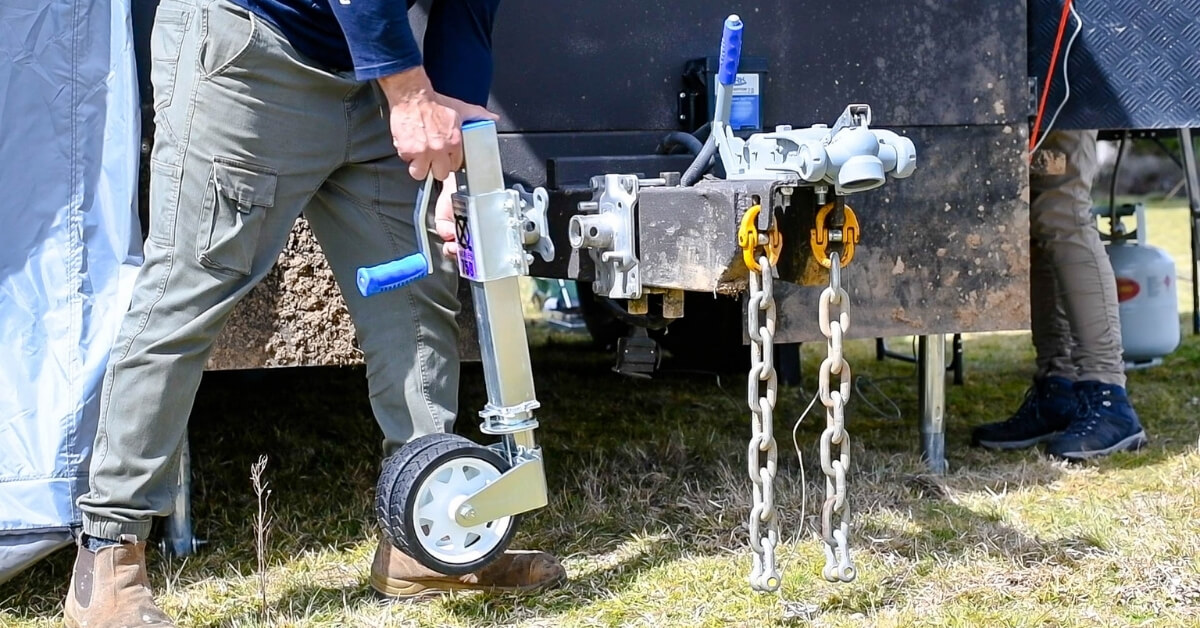
The jockey wheel is an important component of any trailer, but especially a caravan. The thing is, not all jockey wheels are the same, and when it comes to caravans getting one that suits is really important – after all, the last thing you want to ruin your holiday is the jockey wheel to fail!

There are a few things you need to consider when selecting a jockey wheel for your caravan. First, the dimensions of your van, including the size, weight and drawbar height – is a huge consideration, as you’ll want to make sure that the jockey wheel you select can physically handle your van. Secondly, your tow vehicle and any accessories you may have specific to towing, such as a stone guard. For example, if you’re towing a large caravan that has off-road suspension and big tyres with a modified 4WD, the whole setup will be sitting much higher off the ground than if you’re towing with a standard ute, sedan or station wagon. Thirdly, is to consider the kind of destinations and places you’ll be towing your van. For example, if you’re looking at staying at a caravan park in town with a firm base/concrete slab to setup your van, then your requirements will be very different to someone who is looking at doing a lap of the country and setting up at rugged and remote bush sites. 


Once you’ve considered your unique needs, you’ll want to look at the options available. Here are some of the options that you’ll come across and that you should be considering depending on your needs:

Standard Jockey Wheels

A standard jockey wheel, such as the Ark Economic Jockey Wheel, features a 250mm maximum height extension, a solid rubber tyre and is rated for up to 350kg. While a reliable and less expensive option, they are really only suitable for lightweight towing.

Premium Jockey Wheels

Rated up to 350kg with solid rubber tyres and Sunraysia-style powder coated rims, a premium jockey wheel such as these, are a high-quality and stylish option. They also have a few neat little features, such as the Easy-tilt swivel system clamp handle and fold-away winding handle. 

Heavy Duty Jockey Wheels  

For those towing a bit more weight, a Heavy Duty Jockey Wheel, such as this option, is available in either fixed or swivel options and features a high 500kg load capacity and sealed bearings that protect the wheel in an off-road environment. There are Heavy Duty Jockey Wheel options with both 8in and 10in wheels, so whether you’re looking for affordability or ease of movement, there’s an option available.

off-road-jockey-wheel


Pneumatic Jockey Wheels

This style, such as the 10″ Pneumatic Jockey Wheels, features a large 10in inflatable tyre specially designed to cope with difficult ground conditions. That makes them great for off-road use and even towing and camping on sand or other soft sites.

Differences Between Trailer Jockeys and Caravan Jockeys

Ratchet Jockey Wheels

For example, the Ark Ezi-Mover Ratchet Jockey Wheels are designed to easily maneuver caravans weighing up to 2 tonnes on an even surface with minimal effort. They’re easily operated by rotating the controls and feature four functions: forward, reverse, neutral and stop/lock.

Offroad Specific Jockey Wheels

If you’re planning to explore the more remote regions of the country and expecting to camp at remote and rugged campsites that are only accessible to 4WDs and off-road caravans, then you’ll need a jockey wheel to suit. An off-road specific jockey wheel, such as the XO Series, are specifically designed to handle anything the Aussie bush can throw at it. They’re super tough, but they’re also highly versatile with multiple height options, a highly maneuverable trailing yoke design, different yoke locking positions and are available in many sizes, weight ratings and cover most of the styles mentioned above. 

Where to go for more information?

Ark are the experts when it comes to jockey wheels for your caravan. They’ve been leaders in trailer parts, towing gear and 4WD accessories for over 40 years, are 100% Australian owned and independent.

Consult the experts at Ark today to find the right Jockey Wheel for your caravan! 

Categories: News

on

Part 4 of Mitch’s complete trailer rebuild A jockey wheel is a great, affordable addition to any trailer. Before you attach the new jockey wheel, remove any wiring and brackets that are in the way. Find a suitable position that won’t interfere with the winch post or trailer hitch.

Hold the jockey wheel vertically in the rough location it is to be fastened (my trailer is upside down, due to the total rebuild). Align the holes in the mounting plate with the draw bar and insert two U-bolts surrounding the draw bar in the process.

With the mounting plate loosely attached to the drawbar, operate the jocke wheel through its full range of motion to check for clearance of the hitch point and the winch post. In my case I had to move the mounting plate back around two inches.

Once you’re happy with the location of the mounting plate, tighten the four bolts so that they are nice and firm. Operate the wheel through the full range of motion again and check for clearance. Mark where the mounting plate is so that when you remove it for painting, you know exactly where it needs to be.

To bring the trailer back to life, it’s time for a coat of paint. There are a few different methods you can employ, for example spraying or rolling. Killrust™ offers pressure packs or paint tins – I opted for the paint tin and roller. After you have prepared the surface and wiped it with wax and grease remover, it’s time to roll on the paint. Make sure you don’t go overboard as too much paint will cause runs

Timber split, wires frayed and blown bulbs. It’s time for an updated light board! There are so many designs on the internet these days; choosing what is best suited to your boat can be quite confusing.

The new telescopic trailer light board from ARK™ takes the guess work out of buying a new light board. Its lightweight and compact design is very easy to use with eight different adjustments from 85cm to 185cm, and it also comes with a built-in number plate holder and light. Easily the best light board on the market.

As you can see, the end result has turned out pretty good. You could spend extra money on a pneumatic spray gun and compressor but at the end of the day, that’s the price of a new rod and reel combo!

on

Two of the fastest wearing parts on your trailer are the rollers and skids, which bear the brunt of the punishment from the salt and the sun’s UV rays. The polyurethane starts to break down after years of harsh treatment making it difficult to selflaunch and recover your boat.

You’ll find many of the older trailers will have bulky timber skids. Yes these are larger than the new lightweight ARK polyurethane skids, as well as being twice the weight. They also tend to wear a lot faster, preventing them from moving freely.

To obtain the right height of the rollers, you want to have a starting point. Firstly, install all rollers, adjusting them enough that the boat will clear the wheel arches and be as level as possible.

At the rear of the trailer, the same principle applies. The centre roller has two adjustments – try to keep them even or irregular wear will occur.

Now to make those rollers work! The easiest way to do this is to load the boat back onto the trailer with the aid of a mate. Lie underneath the boat and slide the rollers up to meet the bottom of the hull – make sure you keep the rollers straight.

This is the same for the rest of the rollers and skids. To reduce your boat from thumping around on the trailer while driving, have about an inch gap between the boat and the wheel arches. If the boat needs lifting in places, the easiest way I have found is to utilise a car jack and some pieces of timber – it beats trying to lift it yourself.

If your winch looks anything like this, please do yourself a favour and throw it into the bin. Not only is this dangerous but it could be a massive inconvenience when your boat is left stranded at the boat ramp. The replacement ARK winch is much bigger and also is geared much lower, which means less strain on the winch and much easier operation for the user.

Over ten years of rust is caked onto this trailer and all the components. Invest in some WD-40 to help loosen the attaching hardware and fit the new high-quality ARK components (put a link here to Jockey Wheel U Bolt Set)

Now to line up the new winch. Mark a centre line where the winch is going to sit – hopefully the holes from the old winch line up with the new one. If only one lines up like it did for me, put the new bolt through the hole and tighten it up just enough so the winch can just move. Make it as straight as possible and mark out the new hole with the drill.

I’m replacing the hitch as well as the old one is fairly worn. If you don’t have a jockey wheel, the hardware here can be very stubborn to replace as this is where the trailer cops most of its punishment. In my case I had the grinder handy which made light work of the bolts.

Simply clean back the surface of the trailer so it sits true, then it’s just a matter of putting the new bolts through and tightening them up.