
FAQ
Want to learn more about our products, install processes and how to get the best out of your ARK product? Take a look at our most Frequently Asked Questions.
Can’t find the answers you’re looking for? Our friendly and knowledgeable staff are here to help. Contact us and ask away.
Categories
Click on a Category to find out more
- XO SERIES
- PORTABLE POWER SOLUTIONS
- Trailer Parts
- Towing Gear
XO SERIES
Is the XO Jockey Wheel 750 easy to use?
To operate the wheel, pull the blue handle toward your body to release it and swivel the wheel down to the ground. Push the blue handle flat to the bar, adjust your height, unlock the wheel, and then wind it to raise the trailer into position.
What is the purpose of having a dual wheel setup on the jockey wheel?
The dual wheel design provides a wider footprint, making it safer and easier to travel and maneuver across softer terrains.
What finish do the jockey wheel wheels have?
The Ark XO Jockey Wheel 750 runs on sealed bearings, is pre-zinced and powder coated for a long lasting finish and extended durability.
How does the trailing yoke design work?
To help improve maneuverability of your trailer, the trailing yoke design automatically positions the wheel depending on where you position the draw bar. Five positions are available, helping avoid stone guards, tool boxes, ect while travelling.
How much weight can the XO Jockey Wheel 750 bare?
The Jockey Wheel is able to accommodate loads of up to 750 kg. The bar itself is twice the weight of standard jockey bars (20 kg) offering maximum strength both on road and off.
What heights can the Jockey Wheel 750 be adjusted to?
The jockey bar has 250 mm height adjustability with four different positions. A central swivel point gives the wheel extra strength for larger loads.
What weight load can the coupling plate handle?
The coupling plate is manufactured from 10mm Steel and suitable is for both caravans and trailers up to 3.5 tonnes.
How do you attach chains to the XO series Heavy Duty coupling Plate?
The coupling plate is designed to work with Hammerlock Shackles, avoiding the need to weld chans to the drawbar.
Why do I need two safety chains for towing large trailers?
According to regulations set out by the VSB1 “trailers over 2.5 tonnes and not exceed 3.5 tonnes average tow mass must have two safety chains of designation of 3500kg complying with Australian Standard AS4177.4-1994 or Australian Standard AS4177.4-2004”.
What winches are available in the Ark XO Series?
There are two winches available; the 4500lb and the 9000lb.
What is the rated line pull of the XO Series 4500lb winch?
The rated line pull is 4500lb (2041 kg) for a single line powered by a 3.5 hp motor.
What is the rated line pull of the XO Series 9000lb winch?
The rated line pull is 9000lb (4077 kg) for a single line powered by a 5.2 hp motor.
Do the winches take up a lot of space?
The 4500lb winch is 327mm(L) x 128mm(W) x 122mm(H) with a weight of 25lbs (11.5kg) . The 9000lb winch is 535mm (L) x 162mm (W) x 170mm (H) and weighs 59lbs. (26.8 kg). This makes them suitable for all sized vehicles and trailers.
What size tow ball does the XO 3.5T Coupling need?
The Ark XO 3.5 T hitch connects to standard 50mm tow balls without a flat range. The unique Ark XO Quick Hitch locking system makes it easy to hitch & un-hitch in seconds.
What weight ratings do the Ark XO Series Couplings come in?
Our range of couplings are available in 2 tonnes and 3.5 tonnes. We also have a 3.5 tonne coupling that comes with an in-built park bar. This is more than enough for the average caravan or trailer.
How do I know which size to go for?
To choose an appropriate coupling, you need to know the total tow mass of your caravan or trailer and any additional load it may be carrying (water tanks, kitchenware, accessories, etc). The 3.5 Tonne coupling is appropriate for the majority of medium to large trailers and
PORTABLE POWER SOLUTIONS
How do I know if the battery is fully charged?
A. The % charge of battery value on the lower right hand side of the main data screen will read 100%.
I have installed the battery correctly but the LCD screen reads “Alarm - open circuit”, what is wrong?
The battery is faulty or the 10A “main” fuse is blown, also check battery cables are firmly tightened to battery terminals.
How can I tell what stage the charger is in?
The battery charging cycle is indicated on the lower left hand side of the main data screen.
What does Ahr mean?
An “amp hour” (abbreviation Ahr) is a unit of electrical charge and refers to the battery’s capacity. A power source rated at one amp hour can deliver one amp continuously for one hour or two amps for half an hour or sixty amps for one minute etc.
What type of batteries will the ArkPak charge?
The ArkPak AP730 can charge lithium iron phosphate batteries and most types of rechargeable 12V lead-acid type battery from 60 Ahr capacity up to 140Ahr. There are four main types of 12V lead acid battery – conventional wet lead-acid battery, calcium, AGM and gel. The ArkPak can charge both cold cranking type car batteries and deep cycle batteries.
How do I know which battery type and Ahr rating to select?
Normally the battery type and Ahr rating is marked on the battery by the manufacturer. If you are not sure contact your battery retailer. It is very important that the correct battery type is selected since the charger uses a different charge technique for each battery type.
Can I charge the battery using the external terminals or accessory sockets?
Yes you can, as long as the main isolator switch is in the “on” position. This type of charging is not controlled by the on-board microprocessor since the charge current will flow direct to the battery via the main isolator switch. If an external voltage regulator is not used there is a risk of overcharging and damaging the battery. Please also consider the accessory sockets are fused at 10A so a current flow higher than this will blow the fuse.
Can I leave the ArkPak continually plugged in?
Yes the ArkPak will go into float cycle.
My AC adaptor gets hot when charging, is that okay?
Yes that is normal, it can reach 75°C.
Can I charge the battery and power a device at the same time?
Yes, the ArkPak is designed to do this.
Why doesn’t my ArkPak go into charge cycle?
AC adaptor could be blown and needs replacing.
When I connect my laptop AC adaptor to the AC outlet an alarm sounds with two beeps, why is that?
For some laptop adaptors the in-rush current can trigger the alarm and the internal inverter will protect itself. The issue can be overcome by turning the Arkpak AC outlet on first (so green LED is lit), then turning on the laptop and finally connecting the laptop adaptor to the laptop and Arkpak AC outlet.
My 240V outlet keeps blowing the 30A fuse, why is that?
The device you have plugged into the 240V outlet is unsuitable (could be too powerful) and has damaged the internal inverter.
Can I install the ArkPak into my vehicle as part of a dual battery installation?
Yes you can however, you will need a dual battery wiring kit installed into your vehicle. We recommend you get this kit installed by a qualified auto electrician. You can connect the dual battery wiring loom to the ArkPak either via the external terminals or the Anderson socket. Please remember the main isolator switch must be in the “on” position. The ArkPak can be fixed into your vehicle using the accessory mounting kit (Part no. APB20B – not included). The ArkPak cannot be mounted into the vehicle’s engine bay.
Can I charge the battery using solar panels?
Yes you can, as long as the main isolator switch is in the “on” position. This type of charging is not controlled by the on-board microprocessor since the charge current will flow direct to the battery via the main isolator switch. If an external voltage regulator is not used there is a risk of overcharging and damaging the battery.
Why is the time remaining value often different to the actual time taken?
The predicted time remaining value is an estimate only. The time prediction is affected by many variables such as temperature, battery age and battery type and it is impossible for it to be completely accurate but it is a useful guide.
Is it possible for the ArkPak to power a device if it is turned off at the control panel?
Yes, it is, since the various output socket are connected direct to the battery via the main isolator switch and not via the smart charger. However it will not be possible to determine the battery voltage or the time remaining if this is done.
Why doesn't my Arkpak go into charge cycle?
There are several possible reasons. If you are charging the battery and running a device at the same time the screen will show discharge cycle if the output current is higher than the charge input current. This is normal. Another reason could be the AC adaptor has failed. You can check the AC adaptor by trying to turn the screen on with the AC adaptor connected but the battery disconnected. If the screen won’t turn on the AC adaptor is not working. A replacement can be sourced by contacting Ark Corporation. Another reason could be that the built-in charger PCB has failed. This is the case if the AC adaptor black box makes a faint beeping sound when you try to charge from mains power. Also the DC car lead will continuously blow the plug 10A fuse. In this case the Arkpak will need to be returned to Ark Corporation for repair.
My 240V outlet keeps blowing the fuse, why is that?
The device you originally plugged into the 240V outlet is unsuitable (could be too powerful for the maximum rating) and has damaged the internal inverter. Another sign of a damaged inverter is that the fuse is OK but the over temperature alarm sounds as soon as you turn the inverter on. The inverter will need to be replaced.
My Arkpak charges from 240V but not from the vehicle 12V cigarette socket, why is that?
The fuse in the Arkpak DC car lead cigarette plug or the vehicle side fuse for the 12V socket could be blown. If both these fuses are OK then in some instances the Arkpak will not charge if there is a large voltage drop between the start battery and the vehicle 12V socket (can occur if an aftermarket 12V socket is fitted at the back of the vehicle). The Arkpak low voltage charge cutout has activated in this case.
Why is there no output power from any of the Arkpak outlets (12V socket, 240V outlet etc) but the fuses are OK?
Either the battery is flat (under 10.5 volts) or the main isolator switch has a fault and wont connect to the battery in the “on” position. If the isolator has a fault the Arkpak will need to be returned to Ark Corporation for repair.
How do I know if the battery is fully charged?
The % charge of battery value on the lower right hand side of the main data screen will read 100%.
I have installed the battery correctly but the LCD screen reads “Alarm - open circuit”, what is wrong?
The battery is faulty or the 10A “main” fuse is blown, also check battery cables are firmly tightened to battery terminals.
How can I tell what stage the charger is in?
The battery charging cycle is indicated on the lower left hand side of the main data screen.
What does Ahr mean?
An “amp hour” (abbreviation Ahr) is a unit of electrical charge and refers to the battery’s capacity. A power source rated at one amp hour can deliver one amp continuously for one hour or two amps for half an hour or sixty amps for one minute etc.
What type of batteries will the ArkPak AP715 charge?
The ArkPak AP715 can charge most types of rechargeable 12V lead-acid type battery from 60 Ahr capacity up to 140Ahr. There are three main types of 12V lead acid battery that the AP715 can charge – conventional wet lead-acid battery, AGM and gel. The AP715 is not suitable for charging Calcium batteries. The ArkPak can charge both cold cranking type car batteries and deep cycle batteries.
Can I charge the battery using the external terminals or accessory sockets?
Yes you can as long as the main isolator switch is in the “on” position. This type of charging is not controlled by the on-board microprocessor since the charge current will flow direct to the battery via the main isolator switch. If an external voltage regulator is not used there is a risk of overcharging and damaging the battery. Please also consider the accessory sockets are fused at 10A so a current flow higher than this will blow the fuse.
Can I leave the ArkPak continually plugged in?
Yes the ArkPak will go into float cycle.
My AC adaptor gets hot when charging, is that okay?
Yes that is normal, it can reach 75°C.
When I connect my laptop AC adaptor to the AC outlet an alarm sounds with two beeps, why is that?
For some laptop adaptors the in-rush current can trigger the alarm and the internal inverter will protect itself. The issue can be overcome by turning the Arkpak AC outlet on first (so green LED is lit), then turning on the laptop and finally connecting the laptop adaptor to the laptop and Arkpak AC outlet.
My 240V outlet keeps blowing the 15A fuse, why is that?
The device you have plugged into the 240V outlet is unsuitable (could be too powerful) and has damaged the internal inverter.
Can I install the ArkPak into my vehicle as part of a dual battery installation?
Yes you can however, you will need a dual battery wiring kit installed into your vehicle. We recommend you get this kit installed by a qualified auto electrician. You can connect the dual battery wiring loom to the ArkPak either via the external terminals or the Anderson socket. Please remember the main isolator switch must be in the “on” position. The ArkPak can be fixed into your vehicle using the accessory mounting kit (Part no. APB20B – not included). The ArkPak cannot be mounted into the vehicle’s engine bay.
Can I charge the battery using solar panels?
Yes you can as long as the main isolator switch is in the “on” position. This type of charging is not controlled by the on-board microprocessor since the charge current will flow direct to the battery via the main isolator switch. If an external voltage regulator is not used there is a risk of overcharging and damaging the battery.
Is it possible for the ArkPak to power a device if it is turned off at the control panel?
Yes, it is, since the various output socket are connected direct to the battery via the main isolator switch and not via the smart charger. However it will not be possible to determine the battery voltage or the time remaining if this is done.
Can I use the ArkPak to jump start a car with a flat battery?
Yes you can as long as the battery installed in the ArkPak is a cold cranking battery.
Can I jump start the car using a deep cycle battery?
Yes you can however you need to connect the battery to the vehicle’s starting battery for an hour to charge the starting battery. The deep cycle battery will need to be fully charge or near to.
Can I charge the battery and power a device at the same time?
Yes, the ArkPak is designed to do this.
Why doesn’t my ArkPak go into charge cycle?
AC adaptor could be blown and needs replacing.
My cigarette socket won’t provide power anymore, what is wrong?
Check the 10A fuse under the lid. If the fuse is okay, turn the main isolator switch on and off a few times. Otherwise the battery may be flat.
Four things to consider when choosing a solar power system
Power consumption: This is measured in watts drawn per hour. Just multiply the watts of your appliance by the length of time used. Watts x Time = Daily power consumption. For example, a 60W laptop that is used for 5 hours a day will draw 325 Watts.
Battery Capacity: This is the amount of energy that your battery can store, measured in amp hours (Ah). To convert the amp hours into watts, simply multiply the amp hours by the battery voltage. For example, a 130Ah, 12V battery corresponds to 1560 watts.
Power generation: This is also measured in watts per hour. Just multiply the watts of your solar panel by the time exposed to the sun. Then multiply that amount by the natural factor of 0.8, to amount for the natural losses of energy through panel efficiency and weather conditions.
Solar charge controller: Solar charge controllers regulate the current from the solar panels and prevent the battery from overcharging. They need to be matched to or above the output current of the solar panels.
Without solar panels: A battery capacity of 1560 watts can provide a laptop with 325 watts per day for 4.8 days. Just divide the battery capacity by the power consumption 1560W / 325W = 4.8 days.
With solar panels: Using a 60W solar panel 384 watts per day means you will power your laptop of 325 watts per day permanently. That’s because the power consumed by the appliance is lower than the power generated from the solar panels.
Aligning your solar panels:

Trailer Parts
How to refit a boat trailer
Why throw your old trailer away when you can easily rebuild it with a bit of work. This guide, originally published in Modern Boating magazine, will show how to do rebuild your trailer the right way.
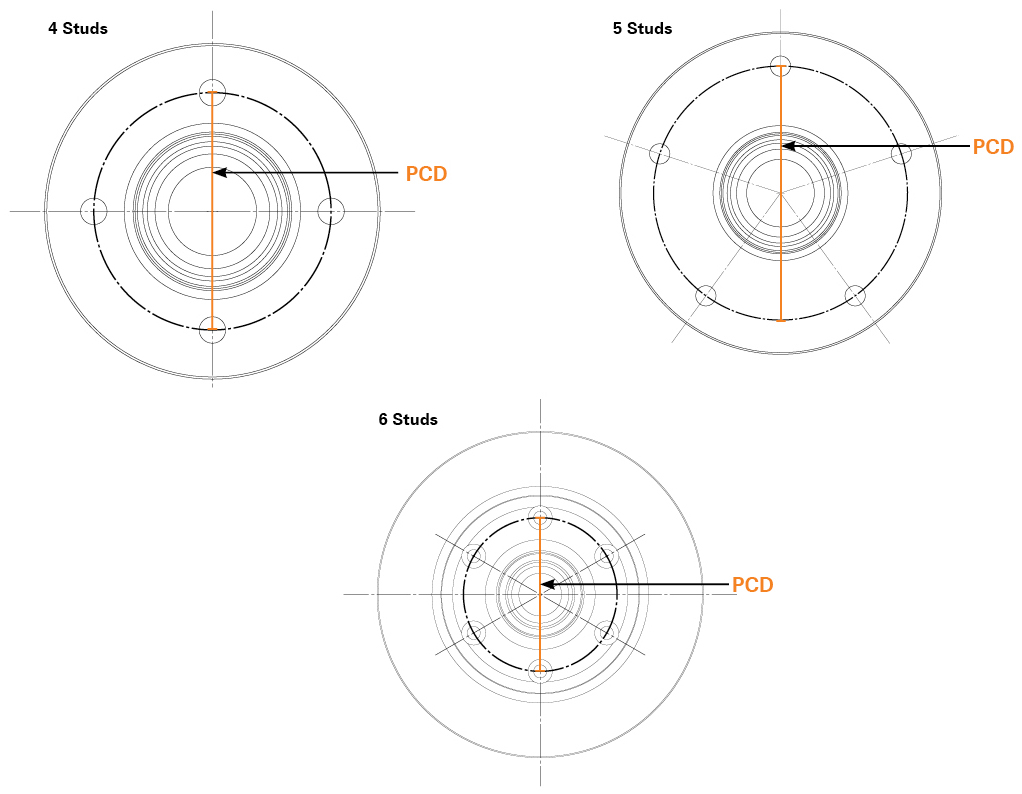
How to measure your P.C.D (Pitch Circle Diameter)
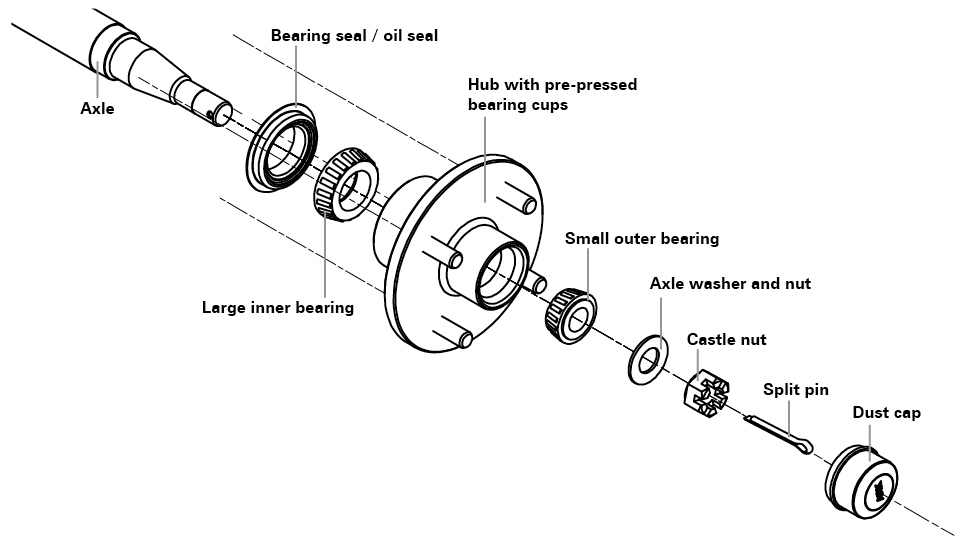
You’ll find a wide range of high quality cast iron trailer hubs in galvanised and plain steel finish in our shop. Our selection includes non-braked lazy hubs and braked hubs in the form of Disc Rotors and Hub Drums. Every hub kit purchase comes complete with seals, dust caps, stud nuts, bearings, pre-pressed studs and bearing cups.
It’s important that you use the proper size replacement parts. Whether you’re replacing your entire hub or rebuilding an old one, Ark has got you covered.
Here are some key points to consider when replacing your hub:
- Determine the number and size of studs.
- Figure out the stud pattern. You can do that by measuring the PCD (Pitch Circle Diameter) on your hub.
- Determine the inner and outer bearing size. You’ll find that most bearings are stamped with a reference number that makes it easier to identify its diameter. Alternatively, you can measure your axle’s size.
Hubs can run quite a few bearing combinations, so make sure you get your bearing size right. Below are just a few of these combinations:
- Tapered Hub – The most common hub utilised where the hub will run on the axle with a small outer and large inner bearing.
- Parallel Hub – Utilised where a larger carrying capacity is needed for that specific axle setup. Runs on the axle with a large inner and outer bearing.
Here is what you must do when rebuilding or servicing your existing hub body:
- Make sure all your studs and nuts are intact with clean thread free from burs.
- Check that all your bearing are well-maintained. Remember to replace the inner and outer races or cups even if they don’t show signs of wear. Grease the bearings thoroughly by working grease around the rollers. Pack the hub interior before installing a new grease seal in the back of the hub.
- Make sure that all the rubbers on the grease seals are intact. These play an integral role and should not be neglected.
- Ensure that the dust is intact. This will prevent water and dust from getting into your bearings. It’s good practice to utilise a pair of bearing buddies as these units maintain a good level of grease in your bearings.
- Double check the axle and make sure it’s free from burs, cracks and any sign of deformation.
- Bearing grease quality is extremely important. Special marine bearing grease provides outstanding water washout and perfect corrosion protection.
How to measure trailer axles
On our shop, you’ll find a wide range of beam axles, stub axles and axle accessories in varying sizes, ratings and finishes.
When you’re fitting or replacing an axle, it’s vital to consider your trailer’s GVM (Gross Vehicle Mass). This is the maximum weight of the trailer, including its load. Fitting the wrong axle to your trailer may cause stress and fatigue to the axle, with fatal consequences on the road.
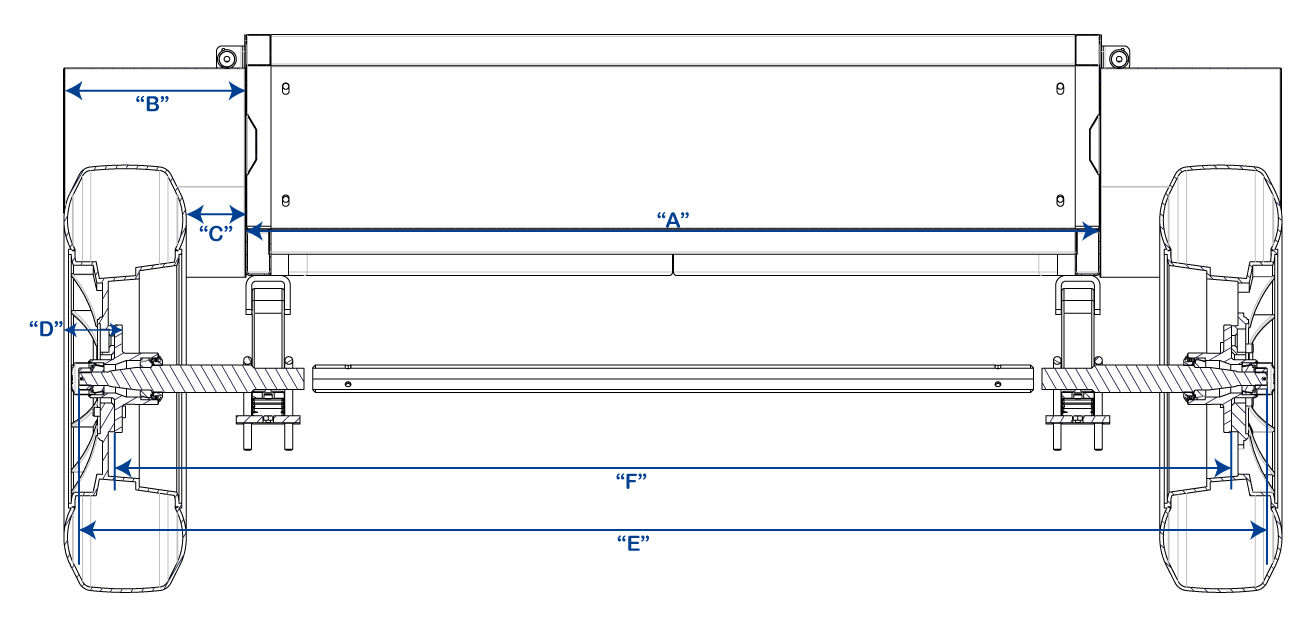
Once you know your trailer’s GVM, you can easily tell whether you need to run a single, dual or tri axle setup. Working out your axle capacities is easy: just divide the GVM over the amount of axles.
If you’re building a new trailer or refurbishing an old one, these measurements are necessary to correctly measure the axle required for your trailer
Springs: How to Measure Trailer Leaf Springs
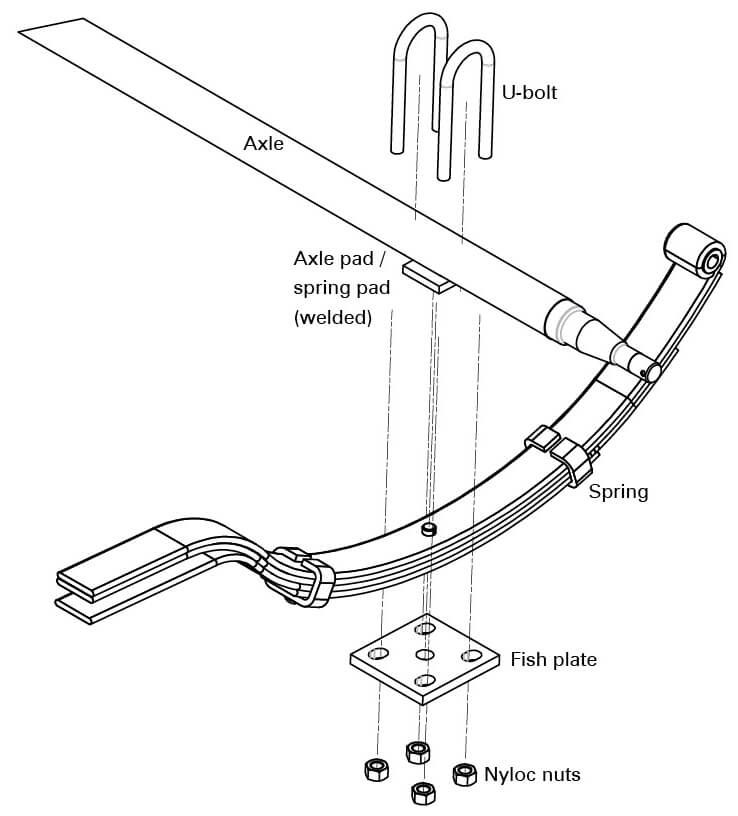
You’ll find a wide range of leaf springs and accessories on our shop. Our range includes slipper springs and shackle springs with various ratings, either galvanised or black-painted.
When you’re fitting or replacing your existing springs, you should keep track of your trailer’s GVM (Gross Vehicle Mass). Fitting the wrong spring to your trailer can lead to overloading, sagging and poor vehicle handling, as well as stress and fatigue to the spring steel. Metal failure can lead to fatal consequences on the road.
Once you know your trailer’s GVM, you can easily tell whether you need to run a single, dual or tri axle setup. Working out your axle capacities is easy: just divide the GVM by the amount of axles.
Start by matching your existing spring (e.g. shackle spring or slipper spring). Once you have matched your spring type, you’ll also have to consider:
- The number of leaves. Each layer of spring metal is considered a leaf.
- The thickness of leaves.
- The inside diameter of the bushing. For example, our slipper springs use a ½’’ bush while the shacke springs use a 9/16’’ bush.
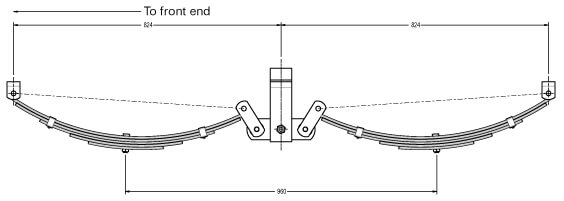
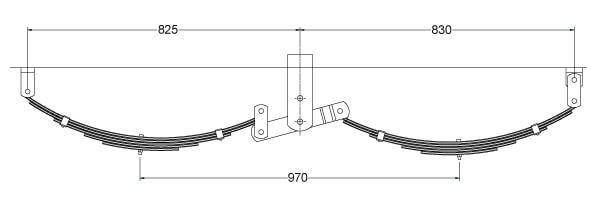
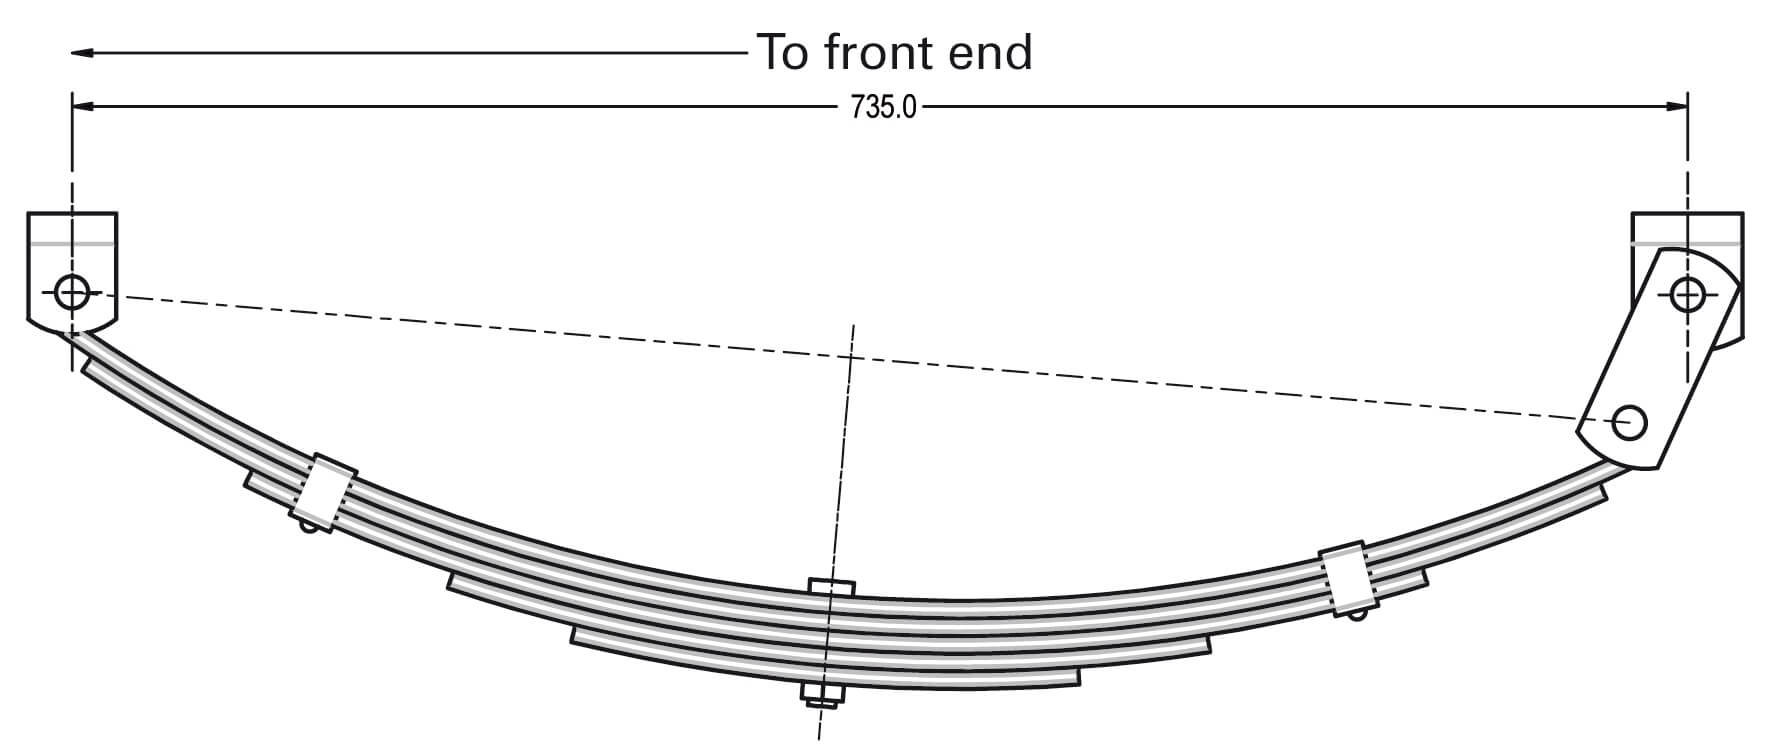
- The length of the spring – For shackle springs, measure from the centre of the front bushing in a straight line to the centre of the rear bushing. For slipper springs, measure from the centre of the front bushing in a straight line to the end of the spring.
- Spring camber — Simply rest the spring on the floor upside down and measure the distance between the foot and the centre spring bolt.
- For dual and tri-axle setups, you’ll have to determine the axle spacing to accommodate your wheel sizes. Once you’ve got that figured out, you can work out your spring centres to determine whether you need to utilise centre or off-centre spring bolts or a combination of the two.
Hub Drum Brakes & Accessories
Trailer Brake recommended maximum load table:
1. All loadings based on GTM of trailer.
2. Consideration must be given to the vehicle tow rating, road surface conditions,
trailer tyre size and condition, trailer rim size and weather conditions.
Drum Brakes
| Part no. | Description | Method of operation | Recommended Maximum Load on 13”/14” Wheels | Recommended Maximum Load on 15”/16” Wheel |
|---|---|---|---|---|
| EBP10R | 10” single backing plate | Electric | 1600kg per axle | 1400kg per axle |
| EBP10L | 10” single backing plate | Electric | 1600kg per axle | 1400kg per axle |
| EBP12R | 12” single backing plate | Electric | n/a | 2500kg per axle |
| EBP12L | 12” single backing plate | Electric | n/a | 2500kg per axle |
| MBP90R | 9” single backing plate | Mechanical | 1200 kg per axle | 1000 kg per axle |
| MBP90L | 9” single backing plate | Mechanical | 1200 kg per axle | 1000 kg per axle |
| HBP90R | 9” single backing plate | Hydraulic | 1450kg per axle | 1200kg per axle |
| HBP90L | 9” single backing plate | Hydraulic | 1450kg per axle | 1200kg per axle |
Part numbers for hub drums that are covered by this table
| 12 inch | 10 inch | 9 inch |
|---|---|---|
| HD12X2LF | HD10X2FD | HD9X134FD |
| HD10X2FH | HD9X134FH | |
| HD10X2HQ | HD9X134HQ | |
| HD10X2HT | HD9X134HT | |
| HD10X25LF | HD9X1345LT | |
| HD10X2LF | HD9X134LF | |
| HD10X2LH | HD9X134LH |
Tyre sizes covered by this table
| 13″ | 14″ | 15″ | 16″ |
|---|---|---|---|
| 195/R15 | 195/R16 | ||
| 7.5/R16 |
Trailer Brake Maximum Load Table
Trailer Disc Brake – recommended maximum load table
1. All loadings based on GTM of trailer.
2. Consideration must be given to the vehicle tow rating, road surface conditions,
trailer tyre size and condition, trailer rim size and weather conditions.
Disc Brakes
Hydraulic with 260mm disc hub
| Part no. | Description | Method of operation | Recommended maximum load on 13″ / 14″ wheels | Recommended maximum load on 15″ / 16″ wheels |
|---|---|---|---|---|
| CH100G | Single caliper | Hydraulic | 2000kg per axle | 2000kg per axle |
Mechanical with 260mm disc hub
| Part no. | Description | Method of operation | Recommended maxium load on 13″ / 14″ wheels | Recommended maxium load on 15″ / 16″ wheels |
|---|---|---|---|---|
| CM100G | Single caliper | Forward pull | 2000kg per axle | 2000kg per axle |
Part numbers for disc hubs that are covered by this table
| Plain | Galvanised | Volex |
|---|---|---|
| DH12HQ/HQF | DH12HQD | VDR12HTG |
| DH12HT/HTF | DH12HQFG | |
| DH12FH | DH12HTG | |
| DH12FD | DH12HTFG | |
| DH12CD/CDF | DH12FHG | |
| DH585LF | DH12FDG | |
| DH58LF | DH58LFG |
Tyre sizes covered by this table
| 13″ | 14″ | 15″ | 16″ |
|---|---|---|---|
| 175/R13 | 185/R14 | 205/R15 | 205/R16 |
| 195/R15 | 195/R16 | ||
| 7.5/R16 |
EziGuide Fitting Instructions for EG10, EG11 and EG13
eziguide self loading boat roller
Fitting instructions compatible with Ezi-guide models EG10, EG11 and EG13.
Tools required:
1. Marker
2. 19mm socket or spanner
Ezi-guide suits both 50mm and 75mm trailer cross members. U-bolts supplied suit 50mm x 50mm cross members only, additional U-bolts need to be purchased for larger 75mm cross members.


1.) Begin with the Ezi-guide LEFT side.
Remove split pin, washer, spring and mounting bracket from the roller arm (refer Diagram. 1)
2.) Reassemble the Ezi-guide without the spring.
3.) Place mounting bracket against trailer cross member as close to the keel roller and align the roller arm against the bottom of the hull (refer Diagram. 2)


4.) Ensure that the distance from the roller arm and the back of the boat is minimum 25mm (refer Diagram. 3)
5.) Minimum distance between the LEFT and RIGHT mounting bracket is 200mm (refer Diagram. 4) the mounting brackets can be adjusted further outward based on the hull design or strake locations. Note: Mounting the brackets too far apart will lose the effectiveness of the Ezi-guide system.


6.) At the outer edge of the mounting bracket, mark a vertical line against the trailer cross member then mark an arrow > against this line on the cross member and another arrow < on the mounting bracket for alignment reference when fitting the Ezi-guide at the boat ramp (refer Diagram. 5)
7.) Reassemble the Ezi-guide LEFT side with the spring.
8.) Repeat step 1 – 7 for the Ezi-guide RIGHT side.
9.) Install the Ezi-guide at a boat ramp as the boat should be off the trailer. Using the vertical line and arrows marked previously, align Ezi-guide mounting brackets with marks and mount with U-bolts and tighten nuts utilising a 19mm socket or spanner (refer Diagram. 6)
10.) Make a test run and ensure roller arms are against the bottom of the hull as originally set and the top roller not resting on any strakes or chines.
11.) Adjustments can be made when the boat is off the trailer again, mounting brackets can be adjusted in all directions.
Retrieving your Boat
Ezi-guides are a self-aligning boat loading system and can be used in either winch on or drive on retrievals.
Tide direction and wind speed should be taken into consideration and extra care should always be taken when loading the boat in these conditions. When driving the boat onto the trailer, boat entrance speed and direction of travel are important factors to consider, misaligning the hull with the centre of the Ezi-guides can cause damage to both the Ezi-guide and the hull of the boat.
(ARK Corporation is not liable for any damage sustained to the boat hull on improper use, excessive boat speed, misalignment or poor mounting of the eziguide systems)
For maximum efficiency when loading the boat
– Reverse the trailer into the water until the keel roller is level with the water, any deeper will lose the effectiveness of the Ezi-guide system.
– Drive the boat towards the trailer, recommended approach is IDLING* speed
– Align the bow with the centre of the Ezi-guide systems and drive boat onto trailer
– Fit winch strap and safety chain
*IDLING speed is when the throttle is just clicked forward of Neutral
Enjoy boating and your new Eziguide.
Towing Gear
What towing gear is available from Ark?
Our range covers everything you need for safe and reliable towing. We have products and accessories including Brake Controllers, Cable Accessories, Cargo Carriers, Connectors, ECU Harnesses, Hitch Covers, Hitch Pins & Locks, Recovery Gear, Shin Protectors, Tow Balls, Tow Ball Mounts, Tow Ball Covers, Towing Kits, Tow Lamp Kits, and Weight Distribution
Contact Us
Can’t find the answers you’re looking for? Our friendly and knowledgeable staff are here to help. Contact us and ask away.

