If you’ve ever dreamed about rebuilding your tired trailer, this is a must read!
How many of us have an old boat and trailer that has certainly seen better days? Years of being submerged in salt water, towed over corrugations and bashed around eventually take their toll on our trailers and leave looking much worse for wear.
Over 15 years ago Shaun and I bought a little Quintrex Dory and trailer combo, and it’s given us hundreds of trouble free hours. We’ve towed the little workhorse up and down the east coast in search of fi sh, and it’s never missed a beat. And this is despite seeing its fair share of beach launches and journeys over dirt roads.
As you can tell by the photos, however, years of use eventually took their toll. A few months ago we made the call to give our trailer an entire rebuild, rather than sending it to the scrapheap (where it wouldn’t have looked entirely out of place)!
We began our research and quickly found out that complete rebuilds aren’t too hard, and they’re much cheaper than buying another trailer. With that in mind we set aside a weekend and got to work, transforming a trailer that was well and truly on its last legs into a beast that’ll serve us well for another 15 years!
Over the next few issues of MB we’ll be featuring that rebuild in detail with the hope that it inspires you to pull out the tools and transform your tired old trailers into something to be proud of at the boat
TRAILER PREPARATION
The first step in any major rebuild like this is to thoroughly prepare the trailer for the work you’re going to be doing. Th is includes inspecting each part and identifying what needs to be replaced and what doesn’t. Ours had seen a lot of use so we opted for a full rebuild as this would ensure no corners were cut, and the entire trailer would then look and feel like new. Only the original frame remains as this was the one component of the trailer that hadn’t taken serious damage.
The suspension, axle and wheel assembly should be able to be removed in one complete unit. Simply remove the bolts which hold the leaf spring in place and the whole unit should slide right out. Be sure to have a spare pair of hands as the bigger trailers have some weight about them.
Even with WD40, most bolts will shear in half so make sure you have new hardware at the ready (stainless steel preferably).
Before you think about slapping some paint on, take time preparing the surface as preparation is the key to a great job. Grab some safety glasses, an air gun and a can of grease and wax remover, run the air over the frame then simply wipe over with the grease and wax remover.
If your trailer has been around for awhile, more than likely it has accumulated some rust. Give all nuts and bolts a good dousing of WD40 a couple of hours beforehand or even soak overnight.
The suspension, axle and wheel assembly should be able to be removed in one complete unit. Simply remove the bolts which hold the leaf spring in place and the whole unit should slide right out. Be sure to have a spare pair of hands as the bigger trailers have some weight about them.
Now for the easy part – applying the paint. I’m using Rust Guard as the primer. The simplest way to apply this is by using a small roller to achieve an even coat.
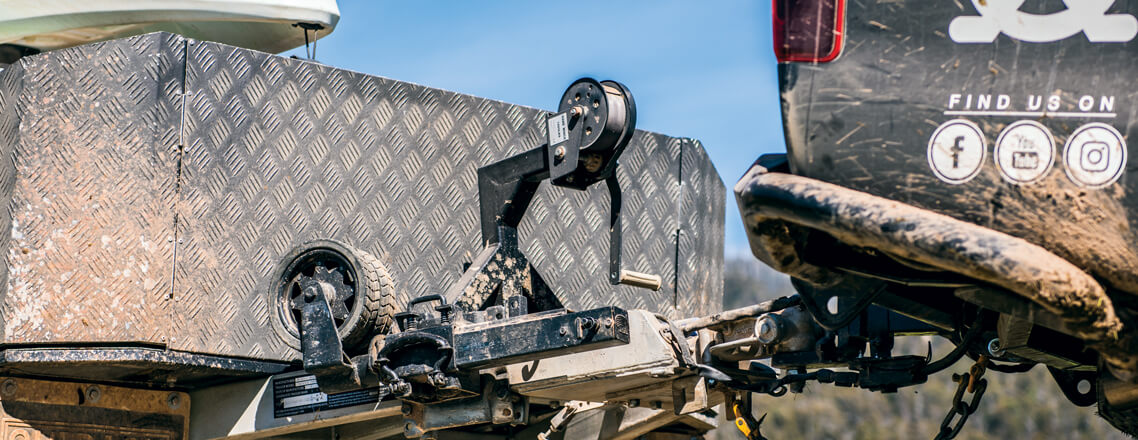
ARK had all the parts we needed for our rebuild. It’s a good idea to buy all of your parts from the same place when doing a rebuild of this size
Time to turn this frame back into a boat trailer. I’m starting with the leaf springs as this will give me the best chance to make sure that everything is square. Simply slide the rear into the box section then bolt the front up with a nylock nut.
To properly align the axle you will need to pick a point on the axle to measure from. I went with the outside edge of the leaf spring. Run a tape from here to the end of the axle and record measurement. If both sides have the same measurement, the axle is aligned. If not, adjust until they’re the same.
With the leaf springs in place, you now can align the axle. First place the 5-hole galv plate, then the U-bolts. Now slide the axle through and roughly centre it. Tighten the nuts up but leave an inch gap between the leaf spring and the axle to accommodate the axle locating plate.
The new leaf springs will easily slide into position if the trailer has been prepped properly
Once the axle is aligned, tack weld the leaf spring locator to the axle. Remove the axle and weld the locators all the way around – be sure to spray the weld with Killrust. Reinstall the axle and tighten all nuts.